


Ensuring your safety on the road begins with understanding the importance of your motorcycle’s braking system. The brake pads are a critical component that directly impacts your ability to stop efficiently and safely. Over time, these pads wear down and can significantly diminish your braking performance if not monitored regularly.
Regularly checking your brake pads is essential for maintaining optimal performance and extending the lifespan of your motorcycle’s braking system. Signs of wear, such as squeaking or inadequate stopping power, indicate that it’s time to assess the condition of your pads. Knowing how to effectively inspect and replace your brake pads will not only enhance your riding experience but also contribute to your overall safety on the road.
This guide will walk you through the steps necessary to check and replace your motorcycle’s brake pads. From identifying the right tools to understanding the replacement process, you will gain comprehensive knowledge about maintaining these vital components, ensuring that your motorcycle remains safe and roadworthy.
Identifying Signs of Worn Brake Pads on Your Motorcycle
Regular maintenance of your motorcycle’s braking system is essential for ensuring safety while riding. One of the critical components to monitor is the brake pads. Identifying signs of worn brake pads can help prevent accidents and maintain optimal braking performance.
One of the most noticeable indicators of worn brake pads is the change in braking noise. If you hear a high-pitched squealing or grinding sound when applying the brakes, it often suggests that the pads have worn down to a point where the metal backing plate is contacting the rotor. This condition can quickly lead to further damage, so take it seriously.
Another sign to watch for is the reduced braking responsiveness. If you find that your motorcycle takes longer to stop or the brakes feel spongy, this could indicate that the pads have worn excessively. It may also be a sign of air in the brake lines or a need for brake fluid replacement, but worn pads should be investigated first.
Visual inspection of the brake pads is also crucial. Remove the wheel to examine the pads closely. If the friction material appears thin–typically less than 1/8 inch–or if there is uneven wear, it’s time for a replacement. Additionally, many brake pads come with wear indicators that will show signs of wear through physical design changes, such as an audible signal when they are nearing the end of their lifespan.
Finally, check for vibrations during braking. If you experience shaking or pulsing when applying the brakes, it might be a sign that the brake pads are unevenly worn or that the braking surface is damaged. Regularly assessing these signs ensures not only your safety but also enhances the longevity of your motorcycle’s braking system.
Step-by-Step Guide to Replacing Your Motorcycle Brake Pads
Replacing your motorcycle brake pads is crucial for maintaining optimal safety while riding. Follow these steps to ensure a smooth and effective replacement process.
1. Gather Your Tools and Materials
Before starting, collect all necessary tools: a socket wrench, pliers, a brake pad spreader, and, of course, your new brake pads. Make sure the pads are compatible with your motorcycle model.
2. Prepare Your Motorcycle
Position your motorcycle on a level surface and use a rear stand to elevate the rear wheel, if necessary. This will provide better access to the brake system and ensure stability while you work.
3. Remove the Wheel
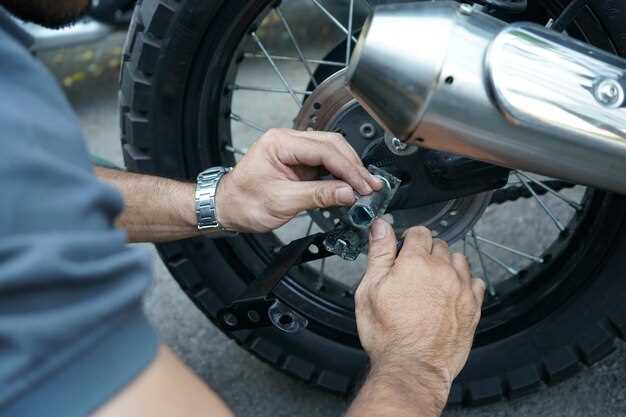
Loosen the axle nut with your socket wrench and remove the wheel from the motorcycle. Keep all hardware in a safe place for reassembly. If your motorcycle has a disc brake, the wheel must be removed to access the brake caliper.
4. Access the Brake Caliper
Locate the brake caliper attached to the disc rotor. Remove the caliper by unscrewing the mounting bolts. Once it’s loose, gently slide the caliper off the rotor. Be careful not to damage the brake line.
5. Remove Old Brake Pads
Identify the retaining pins and clips that hold the pads in place. Carefully remove these components using pliers. Once removed, slide the old brake pads out of the caliper. Inspect the caliper for any signs of wear or damage.
6. Install New Brake Pads
Slide the new brake pads into the caliper fixture. Ensure they are positioned correctly and fully seated. Reattach any retaining pins or clips to secure the pads in place.
7. Reinstall the Caliper
Position the caliper back over the rotor, ensuring it aligns properly with the mounting holes. Tighten the mounting bolts securely but avoid over-tightening to prevent damage.
8. Reattach the Wheel
Slide the wheel back into place, ensuring the brake disc fits between the newly installed pads. Tighten the axle nut to the manufacturer’s specifications.
9. Test the Brakes
Before riding, pump the brake lever or pedal a few times to seat the new pads against the rotor. Check for any unusual sounds or movements that may indicate a problem.
10. Final Inspection
Once the brakes feel responsive, perform a final inspection of all components. Ensure everything is secure and in proper working order before taking your motorcycle out for a ride.
Following these steps will help you successfully replace your motorcycle brake pads, ensuring your bike is safe and ready for the road.
Essential Safety Precautions During Brake Pad Replacement
Replacing brake pads on your motorcycle is crucial for maintaining optimal performance and safety. However, it is essential to take several safety precautions to ensure the process is completed safely and correctly. Follow these guidelines:
- Wear Protective Gear: Always wear safety glasses and gloves. A helmet is also highly recommended while working on a motorcycle.
- Ensure Stability: Use a sturdy motorcycle stand to keep the bike stable and secure. Avoid working on a bike that is not properly supported.
- Work in a Ventilated Area: Make sure your workspace is well-ventilated, especially if using any chemicals or lubricants.
- Disconnect the Battery: Before starting the brake pad replacement, disconnect the motorcycle battery to prevent any accidental electrical issues.
- Follow the Manufacturer’s Guidelines: Refer to the owner’s manual for specific instructions related to your motorcycle model and ensure all steps are followed accurately.
During the replacement process, keep the following considerations in mind:
- Inspect the Brake Components: Check for any signs of wear or damage to other brake components, such as rotors and calipers.
- Clean the Brake Area: Clean the area around the brake pads using a degreaser to remove dust and debris that can affect performance.
- Pay Attention to Orientation: Be mindful of the orientation of the new brake pads. Incorrect installation can lead to performance issues or safety hazards.
- Test Before Riding: After replacing the brake pads, perform a thorough test of the brakes before embarking on any rides. Ensure they are functioning correctly.
By adhering to these essential safety precautions, you can ensure a successful and safe brake pad replacement, ultimately leading to a safer riding experience.